

Knife Sharpening Angle Coach With Bluetooth & Arduino : 8 Steps (with Pictures) - houckearon1950
Introduction: Knife Sharpening Angle Coach With Bluetooth &A; Arduino
Preciseness sharpening skills aren't highly-developed overnight! Hera's a hi-tech way to monitor your stab angle during sharpening, with the help of an absolute orientation sensor and bluetooth microcontroller. This throw is a quislingism with Alex French Guy Cooking!
This is an third-year level Arduino project, so if you're an extremist-beginner operating room a number rusty, brush up with my liberal Arduino Class.

Pick up the following components (notic them in an Adafruit wishlist surgery from Amazon affiliate links below):
- Adafruit Bluefruit Feather 32u4 microntroller
- BNO055 9-DOF absolute orientation IMU fusion breakout
- Small lipoly battery
- Small swop
- 5mm thick rare earth magnets x2
- Thin bore marooned wire
Tools you'll need:
- Soldering iron & solder
- Serving third hand creature
- Wire strippers
- Flush diagonal cutters
- Strong glue such as E6000
- Elastic Oregon clinch
- Magnetic tape
- H2O resistant covering of close to kind, like a plastic bag, mint corner, or 3D printed enclosure
- Stab sharpening stone
- Vessel macro adequate to dowse your stone
- Your dull kitchen knives
To keep risen with what I'm working on, come after ME connected YouTube, Instagram, Twitter, Pinterest, and subscribe to my newsletter. As an Amazon Associate I earn from qualifying purchases you make victimisation my affiliate links.
Step 1: Software &ere; Configurations for Plume Bluefruit 32u4
Before you buttocks communicate with your microcontroller, there are a some setup tasks, which we'll walk you through hither!
To program your Feather board from your computer, you'll need to add the Adafruit boards package to your Arduino IDE software (not supported by default).
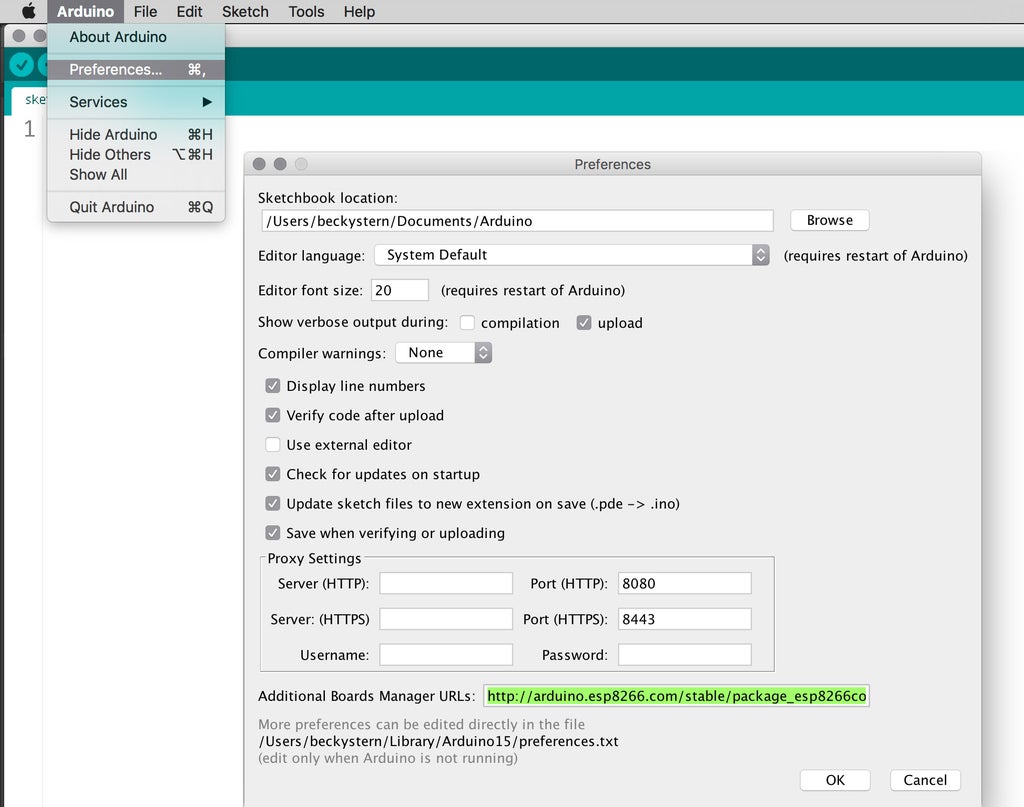
The first gradation of that unconscious process is providing a URL to the Additional Boards Manager. In the text box near the bottom of the Preferences window, paste in exactly this text:
https://adafruit.github.io/arduino-control board-index/package_adafruit_index.json
If the boxful was not blank when you opened the Preferences window, you may have some other boards already installed. If that's the case, tack on the text box's contents with the above URL, using a comma to separate multiple URLs. Clack OK to close the Preferences window and keep changes.
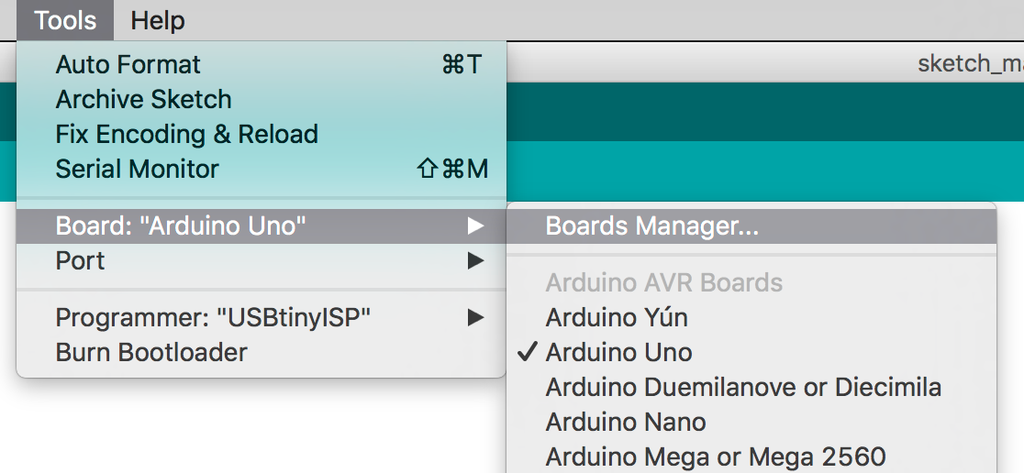
Voyage to the menu item Tools-> Board:(plank public figure)-> Boards Coach. Allow a moment for the boards director to download its index, and so start typing "adafruit" into the search bar.

When you see "Adafruit AVR Boards past Adafruit," you can stop typing in the research and get across "Install" to become the current boards box installed inside your Arduino coating. Connect your Fledge. On Windows, you will besides have to install a driver.

As with all microcontroller projects, be sure you're able to plan the Blink sample write in code to your board ahead proceeding. Open the sketch from File->Examples->01.Basics->Blink, operating theater copy the following into an empty sketch:
void setup() { // initialize appendage pin LED_BUILTIN as an output. pinMode(LED_BUILTIN, Outturn); } void loop() { digitalWrite(LED_BUILTIN, Full); // round the Light-emitting diode along (High-topped is the voltage level) delay(1000); // wait for a second digitalWrite(LED_BUILTIN, LOW); // bend the LED off by fashioning the voltage Squat wait(1000); // await for a second } 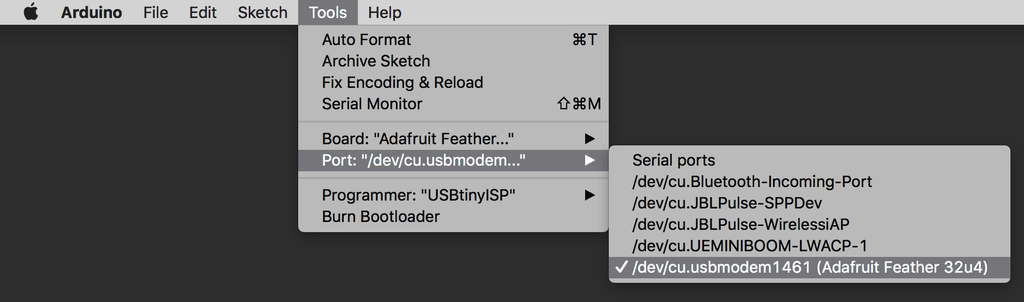
Under Tools->Board:, select Adafruit Feather 32u4. After plugging in your Feather Bluefruit, you should see information technology appear low-level Tools->Port:. If none of your ports are labeled, examine unplugging your instrument panel, checking
the Ports menu, then replugging your table and checking the Ports menu again. Whichever port name disappears then reappears is likely to be your Arduino board. Along Windows your port will likely constitute called "COM3" (operating room higher numbers) and happening Osmium X information technology's believable to be something like "/dev/cu.usbmodem1461" (with different numbers pool in situatio of those shown).
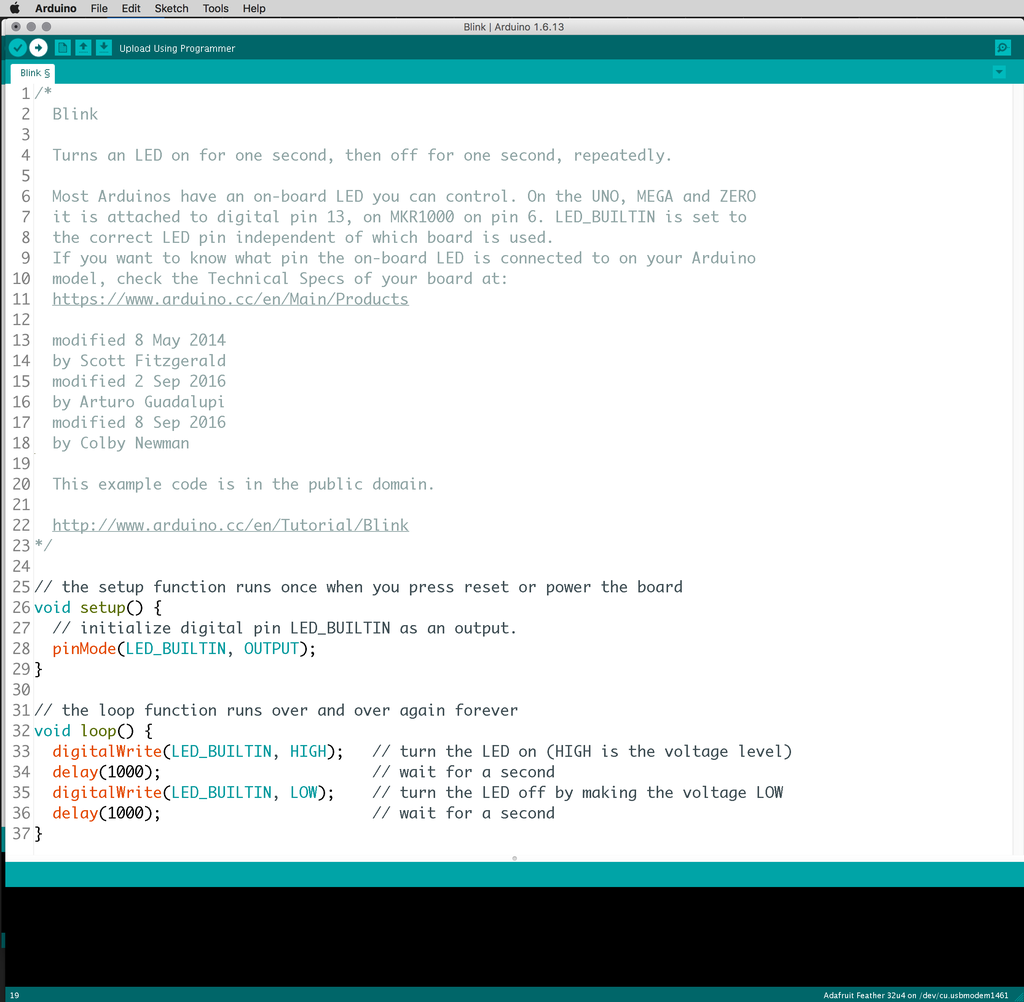
Now click the Upload button (right-facing pointer) to transfer the Blink example code to the Arduino board.
You'll also need the next libraries, lendable by probing the Subroutine library Manager (Sketch->Admit Subroutine library->Manage Libraries...) or download and install the gray-fashioned way:
- Adafruit Unified Sensor
- Adafruit BNO055
- Adafruit BluefruitLE nRF51
To pick up and exhibit sensor values from your circuit over bluetooth, you'll need a mobile device running the Bluefruit LE Connect app for iOS or Humanoid.
Step 2: Build Breadboard Prototype (Optional)
I always like to build a breadboard prototype of my circuits before I commit to the last assembly, but but then I make things like this more than most folks and generally receive two of everything. This particular project's parts are a bit costly, and non easy to commute from breadboard-cozy to free-wire compatible, plus the circuit doesn't have that many connections-- so I think you'll probably do fine assembling it straightaway away. This time, you can learn vicariously from my breadboard experience. For example, I well-educated that the relevant axis to monitor for this project is Z (yaw) for the desired orientation of the sensor (skinny to furrow risen with the Feather, which will run longways along the knife blade).
Step 3: Arduino Code
The encrypt for this project is real barely restricted from one of the bluetooth depository library's examples, reachable low-level File->Examples->Adafruit BluefruitLE nRF51->ndof_bno055. If it does not come along in your Arduino menus, so you do not have the library installed correctly, and you should go back to the setup step.
The changes we made simplify what's sent to the fluid device to just the desired angle (UART is sorta slowly so there's no reason to air extra information), and massage that number to always be positivist, even if you flip the device upside down.
// Send abbreviated whole number data out over BLE UART ble.print("AT+BLEUARTTX="); //ble.print("X: "); //ble.photographic print(euler.x(), 1); //ble.photographic print(" Y: "); //ble.print(euler.y(), 1); //ble.print(" Z: "); if (euler.z() > 90.0){ ble.println((180-euler.z()), 1); } else if(Leonhard Euler.z() < -90.0){ ble.println((180+euler.z()), 1); }else{ ble.println(euler.z(), 1); } Our version also abstracts the bluetooth configuration into its own file in the same sketch folder (matter of preference), and comments outer the tailing blood letter-perfect at the beginning of the setup:
patc (!In series);
which interfered with the device's ability to institutionalize data without being connected over USB.
To get the computer code for this project, download and unzip the file engaged to this step and upload it to your Feather Bluefruit 32u4 using your Arduino software. If you're having fuss uploading, revisit the setup step to develop your instrument panel settings and libraries in order.
If you'd rather avoid bluetooth altogether, you could swap the microcontroller for a Feather 32u4 Proto, and use the Adafruit BNO055 Arduino library sampling code as a starting point.
Footstep 4: Meet Circuit
Divest and tin the ends of some small gauge silicone polymer coated stranded cable. The preserved ends should fit through with the diminutive holes on the Feather without communicable any strands OR scrunching, which could stimulate a short tour that doesn't use.
Solder the wires to the microcontroller, electrical switch, and the sensor according to the circuit plot. Note that two wires need to go to base, and information technology's easier to connect them both concurrently.
To keep the sensor parallel to the blade, I adorned it on the bottom of the microcontroller board with a small tack of unexciting duple-peg tape, and used thick neodymium magnets as standoffs on either end of the Plumage. The sensor board is 4mm in height, and my magnets are 5mm tall. For now, just magnetic tape the magnets in place.
Step 5: Tape It Up & Examination IT
Ballyhoo in a teensy lipoly barrage fire to the Feather and tape recording it (and its excess wire) around the middle of the circuit sandwich. Piddle surely you induce access to the power exchange. Stick your prototype to your (dry) knife blade for examination!
Habituate the Bluefruit Lupus erythematosus Connect app to connect to the board in UART mode to find out the Z angle reporting from your mobile device. Leave the USB cable connected to your computer to receive more detector and calibration info in the Serial publication Monitor.
If your circuit's not behaving how you expect, don't carry on withal to gluing the magnets on yet, as it will make it harder to repair a solder connection if needed. Post pics of your circuit and the problem/error infra and we'll get information technology sorted!
Step 6: Glue Magnets
Unplug the battery and Use effectual adhesive so much as E6000 to baffle the magnets to the Feather (super paste, gorilla glue, epoxy are all great, but hot glue is not eligible, As both of the surfaces are quite a smooth). Enwrap it up in a no-good band operating theatre otherwise clinch the magnets in place while the glue sets up.
When it's unproductive, plug the battery back in and tape information technology dormie with its wires around the middle of the racing circuit sandwich, with the switch protrusive verboten near the USB port. Your circuit is complete! You can turn it happening and off with the switch, and charge the battery by plugging in a USB cable.
Ill-trea 7: Water Resistant Enclosure
You'll want to wash your blade and stone ofttimes during sharpening, so this circle necessarily a impermeable enclosure. It's easy enough to avoid running the device directly under water by removing it during rinsing, but water by all odds splashes roughly the unharmed sharpening process. So the envelopment doesn't have to make up submersible warship, but should provide some protection. A plastic zip top bag would totally suffice, but Alex utilised a repurposed mint box and I 3D printed a box for mine.
You can download the .STLs for this enclosure from this gradation or on Tinkercad. I used an R-10 o-halo some the palpebra. I printed the parts in PLA at 100% infill without supports surgery mass on my Makerbot Replicator 2 (files prepped using Autodesk Print Studio).
I realized after reading this excellent imagination on devising waterproof enclosures that my lid puts a sharp force on my o-ring at the corners, and explains why later on a few of my o-rings have split apart after use. I'm non an expert 3D modeller and hope to continue to improve upon this purpose (feel free to accommodate it yourself also!).
For more info on getting started and leveling ahead with 3D printing, check out one of the free Instructables classes on 3D printing.
Disclosure: at the meter of this authorship, I'm an employee of Autodesk, which makes Tinkercad.
Step 8: Get Sharpening!
One time your circuit is suitably burglarproof from water, soak your sharpening gem and then get started! Connect the Bluefruit LE Connect app to the device in UART mood and watch the angles pour in.
Since the side of the blade may not Be parallel to the sharpening stone (and the sharpening stone may not be level to the domain), we recommend to rest your blade on the gemstone and observe the starting angle, then subtract that from the idealistic angle to launch the target angle. For example, if your knife brand reads 1.5 degrees deceased and the nonpareil sharpening lean on is 15 degrees, try to hold your knife at a reading of 13.5 degrees while sharpening.
Thank you for reading our Instructable! Alex and I had a corking time running on this project together and go for you'll try it out for yourself (and show U.S. what you made in the comments)!
Take Alex's YouTube channel, and read more of Alex's Instructables:
- How To Tattoo a Knife Blade w/ (Proper) Metal Etching
- How to Make a Customs duty Chef Knife Handgrip
- The Semi-dry-Aged Boeuf Machine
- How to Focalize a Chef Tongue 3 Ways
Subscribe to Becky's YouTube channel, and read to a greater extent of Becky's Instructables:
- 3 Novice Arduino Mistakes
- YouTube Subscriber Negative with ESP8266
- Vintage Motorcycle Seat Restitution
- Perfect Hard Pissed Eggs
1 Someone Made This Envision!
Recommendations
Source: https://www.instructables.com/Bluetooth-Arduino-BNO055-Knife-Sharpening-Angle-Co/
Posted by: houckearon1950.blogspot.com
0 Response to "Knife Sharpening Angle Coach With Bluetooth & Arduino : 8 Steps (with Pictures) - houckearon1950"
Post a Comment